Tuesday, 7 December 2021

Chally 2 Wheels & Tracks

With the swinging arms in place the wheels have now been built and given some wear using a scalpel & rough file. With the suspension now movable I can adjust the ride height of the model later to suit my references as I want to depict a tank with a fully warmed up suspension seen in the picture below.


A quick test of the track build up reveals no problems, I thought they might be a bit of a pain to assemble but they are quite easy to build thanks to the track jigs supplied. Detail is again very good and with careful gluing they are fully articulated. 


Sunday, 5 December 2021

Chally 2 Begins!

Made a start this afternoon with the lower hull. This is made up of four parts which fit reasonably well. Some flash is evident and I needed to trim the location tabs on the rear plate slightly as it was too tight. 


The central spar in the hull is a locator for the swinging arms and gives a good positive fit. Each swinging arm has a small tab which fits into a slot on the hull which ensures they all line up. I decided to remove these tabs which makes the suspension workable. Hopefully this will help later on as I want to show a fully warmed up suspension system and I can adjust to suit. 

The wheels look great and I do like the face they have the torque indicators as well. I'll beat these up later with some nicks and dents in the rubber running surfaces.


A quick test fit of the upper hull and I have a slight bit of spay on the front sides around the drivers station and the front hull joint is slightly proud. Nothing some clamping and filling won't solve later on.


Saturday, 4 December 2021

Rye Field Models Challenger 2

Well after yet another protracted rummage through the stash to try and find my next build I've gone for the Rye Field Models Challenger 2. This kit is a cracker as is their TES version so I'm looking forward to the build. 


Colour scheme is yet to be decided but I've got three options to mull over.......


Wednesday, 1 December 2021

Tamiya Marder 1 Finished

Finally finished the model today with the application of some thinned tamiya buff for dust followed by a tiny amount of pigments and some accesories to dress up the fighting compartment. I still have the figures and a base to sort out but this will be done sometime in the new year as I really need to sort out my display cabinets as I have zero room for anymore models in them at the moment. 

Hopefully this will be addressed in the next month or so and I'll finally have space for new builds. 


Saturday, 27 November 2021

Serious Brain Fart!

It had to happen sooner or later, I seem to have forgotten how to paint WW2 German figures! Or more specifically German grey or reed green uniforms. So far I've made two attempts with unsatisfactory results, so I think my memory is finally giving up the ghost!

I'll get there in the end though I'm sure. Meanwhile it's time to clean the man cave before starting on final weathering for the Marder.


While I'm sorting out my addled brain here's a picture of my mad cat squeezed into a really small box. Silly arse now won't let me move it and spends most of the day in it!


Tuesday, 16 November 2021

Marder Matt Coat

After a few more pin washes and a very small amount of oil dot fading the model has now had a good coat of matt varnish. So now all that's left is the final weathering & figures to paint before making up a small diorama base for it.


Friday, 12 November 2021

Marder Getting Dirty

With more dark chipping added and a quick gloss coat I've now added a few pin washes to build up some nice effects. So far it's looking good I think.


Thursday, 11 November 2021

Marder Camo, Decals & Chips

Camo now on the model using tamiya XF 89 dark green & XF 68 NATO brown with a drop or two of yellow added. Now this was the tester for the new airbrush and my shaky hands but it all went according to plan with only a few touch ups needed. 

I then added some very light chips and picked out all the rivets and some raised details with vallejo 837 pale sand before a quick gloss coat and decals. With only three to worry about I then started adding some darker chips for contrast using vallejo 822 German camo black brown. Painting some small dots etc inside the lighter chipping gives a nice effect. 


Saturday, 6 November 2021

Marder Ammo & Painting

Well the ammo set from miniart arrived yesterday but I quickly found that I had either ordered the wrong set or it was underscale as the rounds would not fit the rack & the containers looked too small.  So back to the kit ammo rounds I went and drilled out the ends slightly before adding small discs of plastic card to replicate the percussion caps. I also chopped off the projectiles on a couple of the cases before drilling them out slightly so i could add some spent rounds to the base later.

Cleaned up, primed then painted with mr metal color 219 brass the shells look just fine now. next time I'll just use the kit supplied rounds! 


Next it's paint time for the model but before we talk about that I'll tell you about my recent airbrush woes. For some time I've found my airbrush was not performing as it should. It was suffering from excess clogging and blow back along the needle into the rear body which meant it would jam up and needed a total stripdown after each spraying session. 

Now the airbrush is an Iwata TR2 which I've had for about 16 years or more. On close inspection I discovered some pitting and wear in the main body which would explain my recent issues. A damn shame but to be honest expected after the heavy use it's had since I bought it. In all that time I've only ever replaced two needles and nozzles & a couple of PTFE washes so not too bad at all.

In the end even precision equipment will wear out. I've certainly had my monies worth from it! So a replacement was sought and in the end I went for a Harder & Steenbeck Infinity CR plus two in one. Totally different to the TR2 I know but a few things persuaded me to change my setup. Ease of cleaning was the first followed by better control regarding spray patterns and finally cost.

The airbrush comes with two needle & nozzle sets, 0.4mm & 0.2mm which appealed to me as I'm keen to refine my post shading/fading method and this gives me more options in one package. So I ordered the airbrush yesterday and to my delight it arrived this morning! 

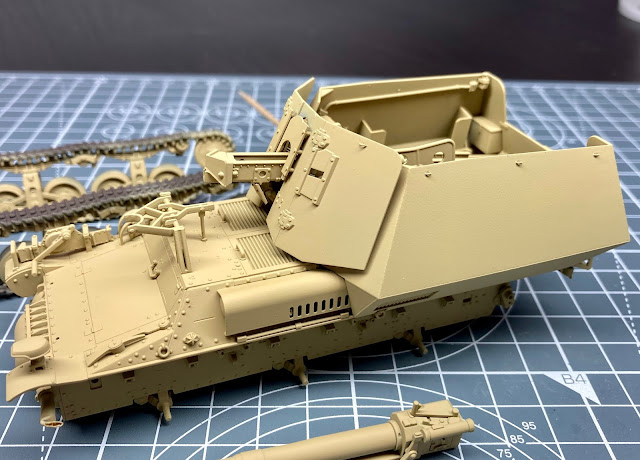
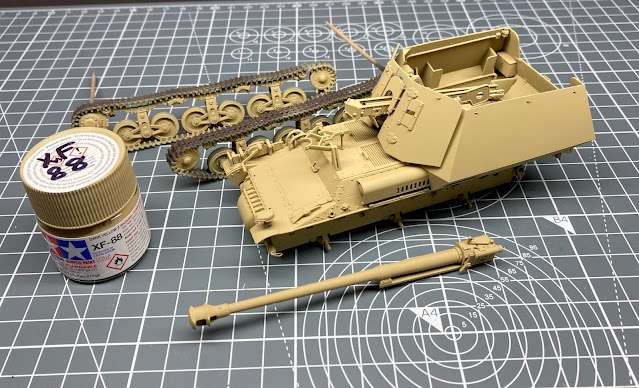
So after a quick test spray it was onto the model and here I used tamiya XF 88 dark yellow 2. I really like this paint, it's the first time I've used it and it seems less green in hue compared to the old tamiya dark yellow. Some fading using flat white added to the yellow will go on later.


Friday, 5 November 2021

Marder In Primer

Cracked on and got the primer on last night after giving the model a good wash to remove any grease and dust residue. This will now cure for a couple of days before the main colours go on.


Thursday, 4 November 2021

Marder Construction Complete

With the final few small parts & figures built up that's the build phase now done. I finished off the rear of the gun shield with some punched bolts and also added tie downs to the hull sides using very thin stretched sprue. This was wound around a pin then sliced to make tiny loops.

The figures are very good indeed needing only a minimum of clean up. I do like the poses as well. I'll sort out some accessories for the model later and have also ordered a miniart ammo set which includes storage tubes and boxes.


Tuesday, 2 November 2021

More Marder Progress

Just a small update today with most of my attention being directed at the rear of the gun shield. Here I filled the four small indents and then added some plastic rod to simulate hinges. A few bolts will go on next to finish it off. 

I've also started adding all the tools and finishing parts to the hull so it shouldn't be too long before it's completed.