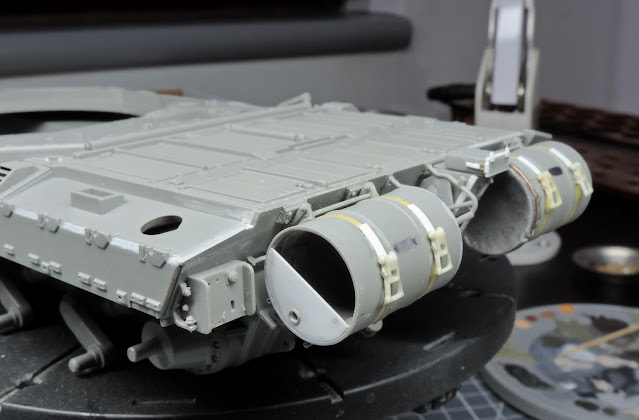
With the second light guard quickly knocked up I've moved onto the rear deck. There's loads of parts to add here such as all the hinges for the deck sections and handles. I added a bit of improvement by removing the solid centre deck handles and replacing with plastic strip. The stowage boxes build up very nicely and I added a couple of accurate armour padlocks and breather pipes.
Thursday, 16 December 2021
Tuesday, 14 December 2021
Challenger 2 More Details
The second drum has now been modified and this time I've gone for a slightly different configuration. The rear mud flaps have also gone on, they are quite thick so some sanding down on the inner surfaces is of benefit for a more scale look. Finally I've added the clear rear light lenses and made up new guards using brass wire as the kit supplied guards are a pain to clean up and are overly thick.
Monday, 13 December 2021
Challenger 2 Adding Extra Details
Working on the rear hull now and so far I've added the electrical conduits for the rear lights, detailed the field phone & first aid box assembly and replaced the molded straps and ratchets on one of the fuel drums. Here I've also added a bit of lead foil for a tarp as the norm on these is to use the drums as stowage. I've also knocked up a better rear indicator located on the top of the fuel can rack.
The fuel drums and their racks will be kept separate which will aid painting and masking later on.
Friday, 10 December 2021
Challenger 2 Upper Hull
I've now got the upper hull on the model after a bit of fettling as the fit was slightly off. I had to gently clamp the front section as the lower hull seemed to be a bit warped. Once it was fully cured the joins where lightly sanded before a bit of Mr surfacer was used to blend it in with the sides.
Next I've started on adding some details beginning with some brackets on the hull sides. On the kit they are just solid strips so I carefully shaved each one off before adding two tiny blocks of plastic card then glued the shaved bracket face back onto these. Looks much better I think.
I've also removed the very weedy looking breather pipes and replaced with plastic rod, again this looks miles better. Finally the front and rear hull sections are having some work done. On the rear I've plugged the location points for the spare track links as they are very rarely seen in place, at least on Salisbury Plain.
Wednesday, 8 December 2021
RFM Challenger 2 Tracks
The first track run is now done and with the jigs supplied this does not take long at all. I added some wear to the track pads on the front and rear faces as that's all that will be seen once finished using my trusty old como mini drill and a round burr bit. For ease of painting & weathering later I drilled out the final track pin and replaced it with a brass one, this also makes it much easier to fit to the model.
Tuesday, 7 December 2021
Chally 2 Wheels & Tracks
With the swinging arms in place the wheels have now been built and given some wear using a scalpel & rough file. With the suspension now movable I can adjust the ride height of the model later to suit my references as I want to depict a tank with a fully warmed up suspension seen in the picture below.
A quick test of the track build up reveals no problems, I thought they might be a bit of a pain to assemble but they are quite easy to build thanks to the track jigs supplied. Detail is again very good and with careful gluing they are fully articulated.
Sunday, 5 December 2021
Chally 2 Begins!
Made a start this afternoon with the lower hull. This is made up of four parts which fit reasonably well. Some flash is evident and I needed to trim the location tabs on the rear plate slightly as it was too tight.
The central spar in the hull is a locator for the swinging arms and gives a good positive fit. Each swinging arm has a small tab which fits into a slot on the hull which ensures they all line up. I decided to remove these tabs which makes the suspension workable. Hopefully this will help later on as I want to show a fully warmed up suspension system and I can adjust to suit.
The wheels look great and I do like the face they have the torque indicators as well. I'll beat these up later with some nicks and dents in the rubber running surfaces.
A quick test fit of the upper hull and I have a slight bit of spay on the front sides around the drivers station and the front hull joint is slightly proud. Nothing some clamping and filling won't solve later on.
Saturday, 4 December 2021
Rye Field Models Challenger 2
Well after yet another protracted rummage through the stash to try and find my next build I've gone for the Rye Field Models Challenger 2. This kit is a cracker as is their TES version so I'm looking forward to the build.
Wednesday, 1 December 2021
Tamiya Marder 1 Finished
Finally finished the model today with the application of some thinned tamiya buff for dust followed by a tiny amount of pigments and some accesories to dress up the fighting compartment. I still have the figures and a base to sort out but this will be done sometime in the new year as I really need to sort out my display cabinets as I have zero room for anymore models in them at the moment.
Hopefully this will be addressed in the next month or so and I'll finally have space for new builds.