Progress on the Ariete has been painfully slow but I have managed to sort out the tracks by using a set of Bronco workable tracks. The detail is excellent, much better than the kit supplied items. Construction although quite complicated was on par to assembling a set of Fruilmodel metal tracks. Plus the Bronco tracks are only a fraction of the cost of white metal!
Also I would like to wish everyone a happy Christmas and hope you all get something model related under the tree.
If only this model was waiting to be unwrapped under my tree!
All the best over the festive season
Pete
Wednesday, 22 December 2010
Monday, 29 November 2010
Ariete adding more details
Sunday, 21 November 2010
Trumpeter Italian Ariete MBT
Here is the latest model to grace the smudgewerks bench, Trumpeters rather nice Ariete up armoured version. I also have a Lion Roar etched set which although intended for the earlier version has plenty of bits which can be used on this kit. The First thing to tackle was the engine deck vent. On the kit this stands proud of the main deck but should be flush so using a compass cutter I removed the offending part and replaced it with a plastic card base and the etched grills. I have also added some missing weld lines to the rear hull from stretched sprue and added etch where I felt it was needed.
The extra armour uses the etch provided in the kit and as you can see I have added some plastic card to the rear to prevent any see through on the completed model. I have also added the missing co-axil gun slot on the front turret armour and hollowed out the front headlights ready for some lenses later on.
Thursday, 18 November 2010
U-boat all done!
Christ that was quick I hear you say! All I can say is that the final stages seemed to just fly together! Adding the rigging to the model was the part I was dreading but it all went without a hitch! As you can see I have used a new base which I feel looks much better than the previous attempt. The U-boat is really enhanced by the addition of the figures which help give the model a sense of scale.
A really enjoyable build and a kit I would recommend. Now let's see what's next in the stash!
Sunday, 14 November 2010
Getting some painting done
Tuesday, 9 November 2010
Crew Figures
The last few days have seen me painting the figures. Quite a challenge in such a small scale but I think they came out OK.
The boat itself has had a blast of primer and is now ready for painting. Only a few more days until the nationals at Telford and I am looking forwards to it. I will be displaying some models on the Locate & Cement stand on Saturday so if you are attending pop along and have a look.
Friday, 5 November 2010
Base work and Figures
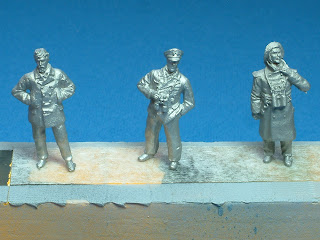
Whilst waiting for paint to arrive I have cracked on with the base. A couple more coats of varnish and it will be ready. Today my figures for the u-boat arrived, these are Hecker & Goros items and they are simply superb. The picture shows them straight out of the packet. Only a little clean up is required and being white metal the detail is fabulous.
Wednesday, 3 November 2010
Dive, Dive, Dive!
The main construction is now complete, I have finished off the deck rails and added two jump line supports on the stern.I have started sorting out a base to mount the model on. Just a simple piece of MDF and a couple of brass rods.
I am also looking at adding some figures and am thinking of using some Hecker&Goros items.
Sunday, 31 October 2010
Holes, Holes and More Holes!
The hull is now almost finished bar adding the railing stanchions which will be added once the main colours are on. Loads more holes added to the hull. I keep discovering little snippets of information which means more to be added! The railings surrounding the deck gun have been scratched from plastic rod as the kit supplied white metal items were a devil to try and fit. Also being metal they bent very easily and looked too big. much happier with the replacement part.
The conning tower is also complete, although this has not been without problems. I somehow lost the starboard side etched grill and after much cursing and tearing the hobby room upside down trying to find it I had to raid the spares box for some suitable etch. Not perfect but better than nothing!
All that's left to add now are two jump wire rests at the stern and a wipe of Mr surfacer over the weld lines. And I thought this build would take a while! just shows how absorbing this hobby can be.
The conning tower is also complete, although this has not been without problems. I somehow lost the starboard side etched grill and after much cursing and tearing the hobby room upside down trying to find it I had to raid the spares box for some suitable etch. Not perfect but better than nothing!
All that's left to add now are two jump wire rests at the stern and a wipe of Mr surfacer over the weld lines. And I thought this build would take a while! just shows how absorbing this hobby can be.
Saturday, 30 October 2010
Taking Shape
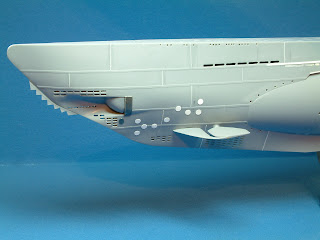
The u-boat is coming along nicely at the moment, I have glued the hull together which was quite a job as there was some warping on the parts plus I only had one pair of hands! Once dry out came the filler for the hull joins and then the mother of all sanding sessions! Strip and scrap plastic was then added to replace sanded off details and add missing weld lines. The lower hull vents where added as well as the sonar arrays.
The conning tower is also taking shape, just a few extra details to add.
Thursday, 28 October 2010
Torpedos Los!
Time for another U-Boat model so on the bench now is the special navy boxing Type IIA U-Boat in 1/72nd scale. An anniversary present from my good lady wife, bless her she does spoil me! Some modifications are being made to the kit, mostly closing up some vent holes on the hull as well as opening up ones on the bow and stern. I have also built up the deck gun which is a mixture of plastic, white metal and resin parts. The kit's plastic barrel was replaced in favour of a length of metal tubing and some tiny bolts added as well.I also made a new firing brace to replace the poor plastic item from brass wire.
I also saw my consultant yesterday to check up on my knee and was told I may return to work. Very pleased about that as I was expecting to be off work longer. However the knee has healed better than expected so I can go on light duties for a week or so.
Subscribe to:
Posts (Atom)