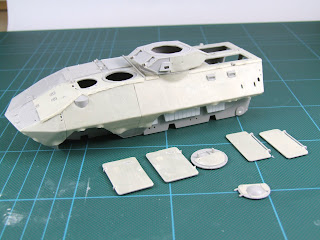
I have now completed adding the kevlar to the model and have added some to the turret as well. I finally deduced that there was kevlar on some Grizzly's by careful study of my references. The magic sculpt worked extremely well and looks very realistic. I can now get back to the kit instructions and start adding everything else.
Thursday, 8 November 2012
Sunday, 4 November 2012
More Kevlar Capers!
I have now finished adding the main areas of kevlar to the hull and now just need to add some to the rear section and all the doors and hatches. I think that the turret was also treated with the armour package but the reference pictures I have are not very clear so further research is needed here.
I have tried to replicate the edges of the sheets lifting slightly as on the real thing they where held in place using velcro. So far so good and the sheets where not too hard to add either!
I have tried to replicate the edges of the sheets lifting slightly as on the real thing they where held in place using velcro. So far so good and the sheets where not too hard to add either!
Saturday, 3 November 2012
Crafty Kelvar
I have now started adding the kevlar covering and as I said I have used magic sculpt which I have rolled out into thin sheets using a wooden dowel and plenty of johnsons baby powder.
The baby powder stops the magic sculpt from sticking to the work surface and tools. I have managed to get nice thin sheets using this method. I then trimmed the sheets roughly to shape and placed on the model.
Once in place further trimming can be done with a knife or scalpel. I find dipping the blade in water helps get a neat cut.
Some smoothing out with a brush and water helps level off the covering. Once it's dry I can refine any details easily. So far it's going nicely and I think it looks very close to the real thing.
Subscribe to:
Posts (Atom)


