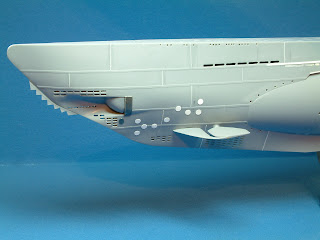
The hull is now almost finished bar adding the railing stanchions which will be added once the main colours are on. Loads more holes added to the hull. I keep discovering little snippets of information which means more to be added! The railings surrounding the deck gun have been scratched from plastic rod as the kit supplied white metal items were a devil to try and fit. Also being metal they bent very easily and looked too big. much happier with the replacement part.
The conning tower is also complete, although this has not been without problems. I somehow lost the starboard side etched grill and after much cursing and tearing the hobby room upside down trying to find it I had to raid the spares box for some suitable etch. Not perfect but better than nothing!
All that's left to add now are two jump wire rests at the stern and a wipe of Mr surfacer over the weld lines. And I thought this build would take a while! just shows how absorbing this hobby can be.
Sunday, 31 October 2010
Saturday, 30 October 2010
Taking Shape
The u-boat is coming along nicely at the moment, I have glued the hull together which was quite a job as there was some warping on the parts plus I only had one pair of hands! Once dry out came the filler for the hull joins and then the mother of all sanding sessions! Strip and scrap plastic was then added to replace sanded off details and add missing weld lines. The lower hull vents where added as well as the sonar arrays.
The conning tower is also taking shape, just a few extra details to add.
Thursday, 28 October 2010
Torpedos Los!
Time for another U-Boat model so on the bench now is the special navy boxing Type IIA U-Boat in 1/72nd scale. An anniversary present from my good lady wife, bless her she does spoil me! Some modifications are being made to the kit, mostly closing up some vent holes on the hull as well as opening up ones on the bow and stern. I have also built up the deck gun which is a mixture of plastic, white metal and resin parts. The kit's plastic barrel was replaced in favour of a length of metal tubing and some tiny bolts added as well.I also made a new firing brace to replace the poor plastic item from brass wire.
I also saw my consultant yesterday to check up on my knee and was told I may return to work. Very pleased about that as I was expecting to be off work longer. However the knee has healed better than expected so I can go on light duties for a week or so.
Tuesday, 26 October 2010
Chop Suey!
Well another one for the display cabinet! Finished off over the last couple of days. I used some of the new tamiya diorama texture paint to add some mud to the wheel arches and lower hull then sprayed a few layers of tamiya buff, I kept the dust subtle as I did not want to loose that lovely camo! Matt varnish then this morning added the lights and the tricky light guards and finally finished off painting the periscopes and a few other touch ups.
Very pleased with the final result, top marks to hobby boss for a stonker of a kit. Now all we need is a decent set of PLA crew figures.
Monday, 25 October 2010
Paint Time
Over the last few days I have primed and painted the model, I used Gunze colours for this and then added some chipping, filters, pin washes and fading. Oh and picked out the small details as well. Really like the camo scheme as I think the colours really work well. Yeovilton show on Saturday was a slight disappointment. I had a job actually seeing any models on display as the lighting was so bad! Very dark and dingy. Next time I will take a torch! Only spent an hour or so there but that was enough.
Once everything is dry I will start adding some mud and dust to the lower hull and maybe a light dry brushing over selected areas.
Saturday, 23 October 2010
Prawn Crackers!
Well another kit that just falls together! I have added a few improvements most notably enhancing the kit weld lines with a pyrograve as well as adding cables to the rear of the light clusters and removing the small indicator and side lights which will be replaced with coloured lenses later on. A few other bolt heads and other bits added and she's done.
Another fab kit which I have really enjoyed so far. I have managed to persuade my wife to take me to Yeovilton today for the model show at the fleet air arm museum (still can't drive you see) so am looking forwards to that. Should be able to potter around without too much trouble as the knee is healing well and I need to exercise it regularly. Great excuse that!
Thursday, 21 October 2010
Anyone For A Chinese?
Well after going through the stash I eventually decided on this little beauty.
Hobbyboss 1/35th ZSL-92B IFV of the peoples liberation army.Another real quality kit with some great detail and an etched fret for the light guards and engine screens. I began by spraying the insides dark grey and fitting the front cab windows. Then the suspension had some work added to it as well as the wheels slightly altered to allow a slight turn to be depicted.
Monday, 18 October 2010
Hurricane Finished!
I have just put the finishing touches and final assembly on the Hurricane and it's all finished. Yesterday saw me adding the panel wash plus some more thinned tamiya smoke to the aircraft as well as finishing off all the small bits. After a coat of matt she was left to dry overnight.
And the final result,
Very pleased with it especially after the problems I had with the decals, a couple of firsts as well for me on this model. Using a vac formed canopy and having to spray over decals with masks I made up. Now what to build next?
And the final result,
Very pleased with it especially after the problems I had with the decals, a couple of firsts as well for me on this model. Using a vac formed canopy and having to spray over decals with masks I made up. Now what to build next?
Sunday, 17 October 2010
Painting And Pesky Decals
The painting stage of the build went very well, I used tamiya RAF colours for this plus some white to add fading and highlighting to the model. The decal stage however was a total disaster! For some reason the decals reacted very badly and wrinkled up something rotten, oh how I cursed! In the end I had to resort to sanding down the offending decals and re spray the buggers, not perfect but good enough with some more weathering over the top.
Decals after sanding down,
And after re spraying,
To say I am relived to have rectified the problem is an understatement! after the work I have put in so far I could not just bin the model, something I would have done a few years back. Must be mellowing in my old age!
Decals after sanding down,
And after re spraying,
To say I am relived to have rectified the problem is an understatement! after the work I have put in so far I could not just bin the model, something I would have done a few years back. Must be mellowing in my old age!
Thursday, 14 October 2010
Hurricane Progress
The Hurricane is coming along nicely with the fuselage halves joined and the wings glued,sanded and re-scribed. Some careful sanding and lots of test fitting was needed to get a good join between the two assemblies. I added some plastic shims to the wings to alleviate a nasty step in the wing root to fuselage joint. The cannon housings where total swine's to fit and needed lots of sanding to sit correctly. Just a brush of Mr surfacer was needed to fill any gaps.
I added some brake lines to the undercarriage and also used a Squadron vac-formed canopy for the first time as I wanted the canopy open on the finished model. I found cutting it out well out of my comfort zone! However by taking my time I managed to clean the parts up OK. I also used a set of Montex masks for the first time, very impressed as I found them much better to use than eduard masks. They also where a better fit as in the past I have found the eduard ones to be a poor fit.
She's now ready for primer and main colours. For these I will be using the RAF specific colours by Tamiya as used on my Meteor build a while back.
Tuesday, 12 October 2010
Hasegawa Hurricane Mk IIC
Here's my next project Hasegawa's superb Hurricane in 1/48th scale. I have wanted to build one of these for some time and managed to pick the kit up for a reasonable sum.
The cockpit has had a etched harness added and then painted using tamiya and vallejo colours.
I have also cut away the moulded rudder actuator assembly and replaced them with a length of brass rod, much better looking than the original.
On a personal note my knee is healing nicely although it is quite painful at times, oh well at least I am making a dent in the stash!
Subscribe to:
Posts (Atom)